

Kenney Jacob


Kenney Jacob is the CEO of Ayruz Data Marketing and a serial entrepreneur with 18+ years in digital marketing. A trusted advisor to brands across travel, real estate, fashion, and tech, he brings deep cross-industry insight into scaling digital campaigns and go-to-market strategies. Featured in the EUIndia40 list of top leaders, Kenney is also a published author and a well-known speaker in India’s marketing ecosystem.
Kenney Jacob
Blogs

Apple Brand Is Built On The New Science Of Customer Emotion
Customer satisfaction has been the most critical factor in building a brand traditionally that helps your business grow. Business seeking growth invests significantly in improving customer satisfaction at every touchpoint. A lot of digital transformation programs focussed on enhancing customer satisfaction and expect an increase from the program. But studies show it is not enough to bring growth for the business.
A study conducted by HBR (Scott Magids, Alan Zorfas, Daniel Leemon, 2017) shows it is essential to connect your customers emotionally to increase revenue and profitability. Emotional branding is 52% more valuable than those who are highly satisfied.
[infogram id="719e8404-e0ca-474f-98ec-db63e1995dc1" prefix="uhR" format="interactive" title="Infographics Blog Post"]
How customer emotion influence is so valuable and what are they
1. They tend to buy more
2. Visit you more often
3. They are less price-sensitive
4. They pay more attention to your communication
5. They follow your advice
6. They recommend your brand to their network
Some of the examples of emotional motivators are given below.
| I AM INSPIRED BY A DESIRE TO: | BRANDS CAN LEVERAGE THIS BY HELPING CUSTOMERS: |
|---|---|
| Stand out from the crowd | Project a unique social identity and be seen as special |
| Have confidence in the future | Perceive that the future is better than the past. Have a positive picture of what is to come. |
| Enjoy a sense of well-being | Feel that life measures up to expectations and that balance has been achieved; seek a stress-free state without conflicts or threats |
| Feel a sense of freedom | Act independently, without obligations or restrictions. |
| Feel a sense of thrill | Experience a deep inward feeling, overwhelming pleasure, and excitement, participating in fun events. |
Based on an article by Scott Magids, Alan Zorfas, and Daniel Leemon. © 2017 Harvard Business School Publishing. All rights reserved.
Case Study – Apple brand is built on the new science of customer emotions
The creative visionary late Steve Jobs always wanted to make a brand by maintaining secrecy surrounding the brand. The hype surrounding their product releases by focusing on brand advocates; creating conversations among both techies and non-specialists alike. The brand has always positioned itself as a “Think different” approach and makes an identity based on it. It creates a sense of identity to stand out from the crowd. Steve Jobs had always been vocal about calligraphy lessons he had always helped him to build a unique identity for his first product.
The aesthetically beautiful products created have enabled the Apple brand to be associated with luxury in the eyes of its followers. The consumers are ready to pay a premium to Apple products which are driven by emotional marketing not the actual value of the product.
Most of the Apple product ads, you won’t see they talk about features or technical features, they make ads to convince tool as an ultimate tool for your life. They sell their product by assigning feelings to the idea of owning it. An example is the iPad Air ad, which shows a pencil on a table with different surroundings until they pull up iPad Air from its behind.
Apple chooses not to mention any features of their new product, yet convince their audience that this is the ultimate tool for creativity. They sell their product by assigning feelings to the idea of owning it. The crux of this advert is not that the iPad is as thin as a pencil, but instead that it opens as many creative doors. Most of the Apple ads follow similar tactics that create a Feel a sense of freedom.
Ecosystem of products
Apple has always been focused on creating products that only work on their ecosystem with their network of products. It allows Apple to make revenue streams because the fans have a sense of feeling that they are buying the most excellent product in the industry. Even without ever mentioning product features, it takes users a matter of minutes to discover how to connect and sync Apple devices. The more Apple products you own, the more benefits there appear to be; apps, music, and videos are all in one place and are accessible on every device.
Every year Apple launches a new iPhone with new things which are already existing in the market packaged nicely. Apple emotion puts customers at the center of everything they design. Consider this; the brand identity is created that makes thousands of people camping outside their stores overnight to pick up a pre-ordered product? Users can have the latest, newest iPhone without having to learn anything new. Open the box, turn it on, and after signing up, you’re ready to use it in precisely the same way you’ve been using your previous phone.
Optimize all touchpoints and functions
It’s critical to optimize emotional connection across all tasks and touchpoints—from product development and marketing to sales and service. Major investment areas are stores, online and omnichannel experiences, merchandising, and message targeting.
Opportunity
There’s a lot of value left on the table and a tremendous opportunity to transform satisfied customer emotion connected ones, and when companies discover that, they find a new source of growth waiting to be tapped. It is important to take a systematic approach, and there is not a predefined formula to build a brand to make an emotionally connected customer. So it is vital to apply tactics, measure, and learn lessons. It is also challenging to measure emotionally connected customers and the growth of the organization. Some of the key metrics to be considered are lifetime value measures such as annual spending, churn, and tenure.
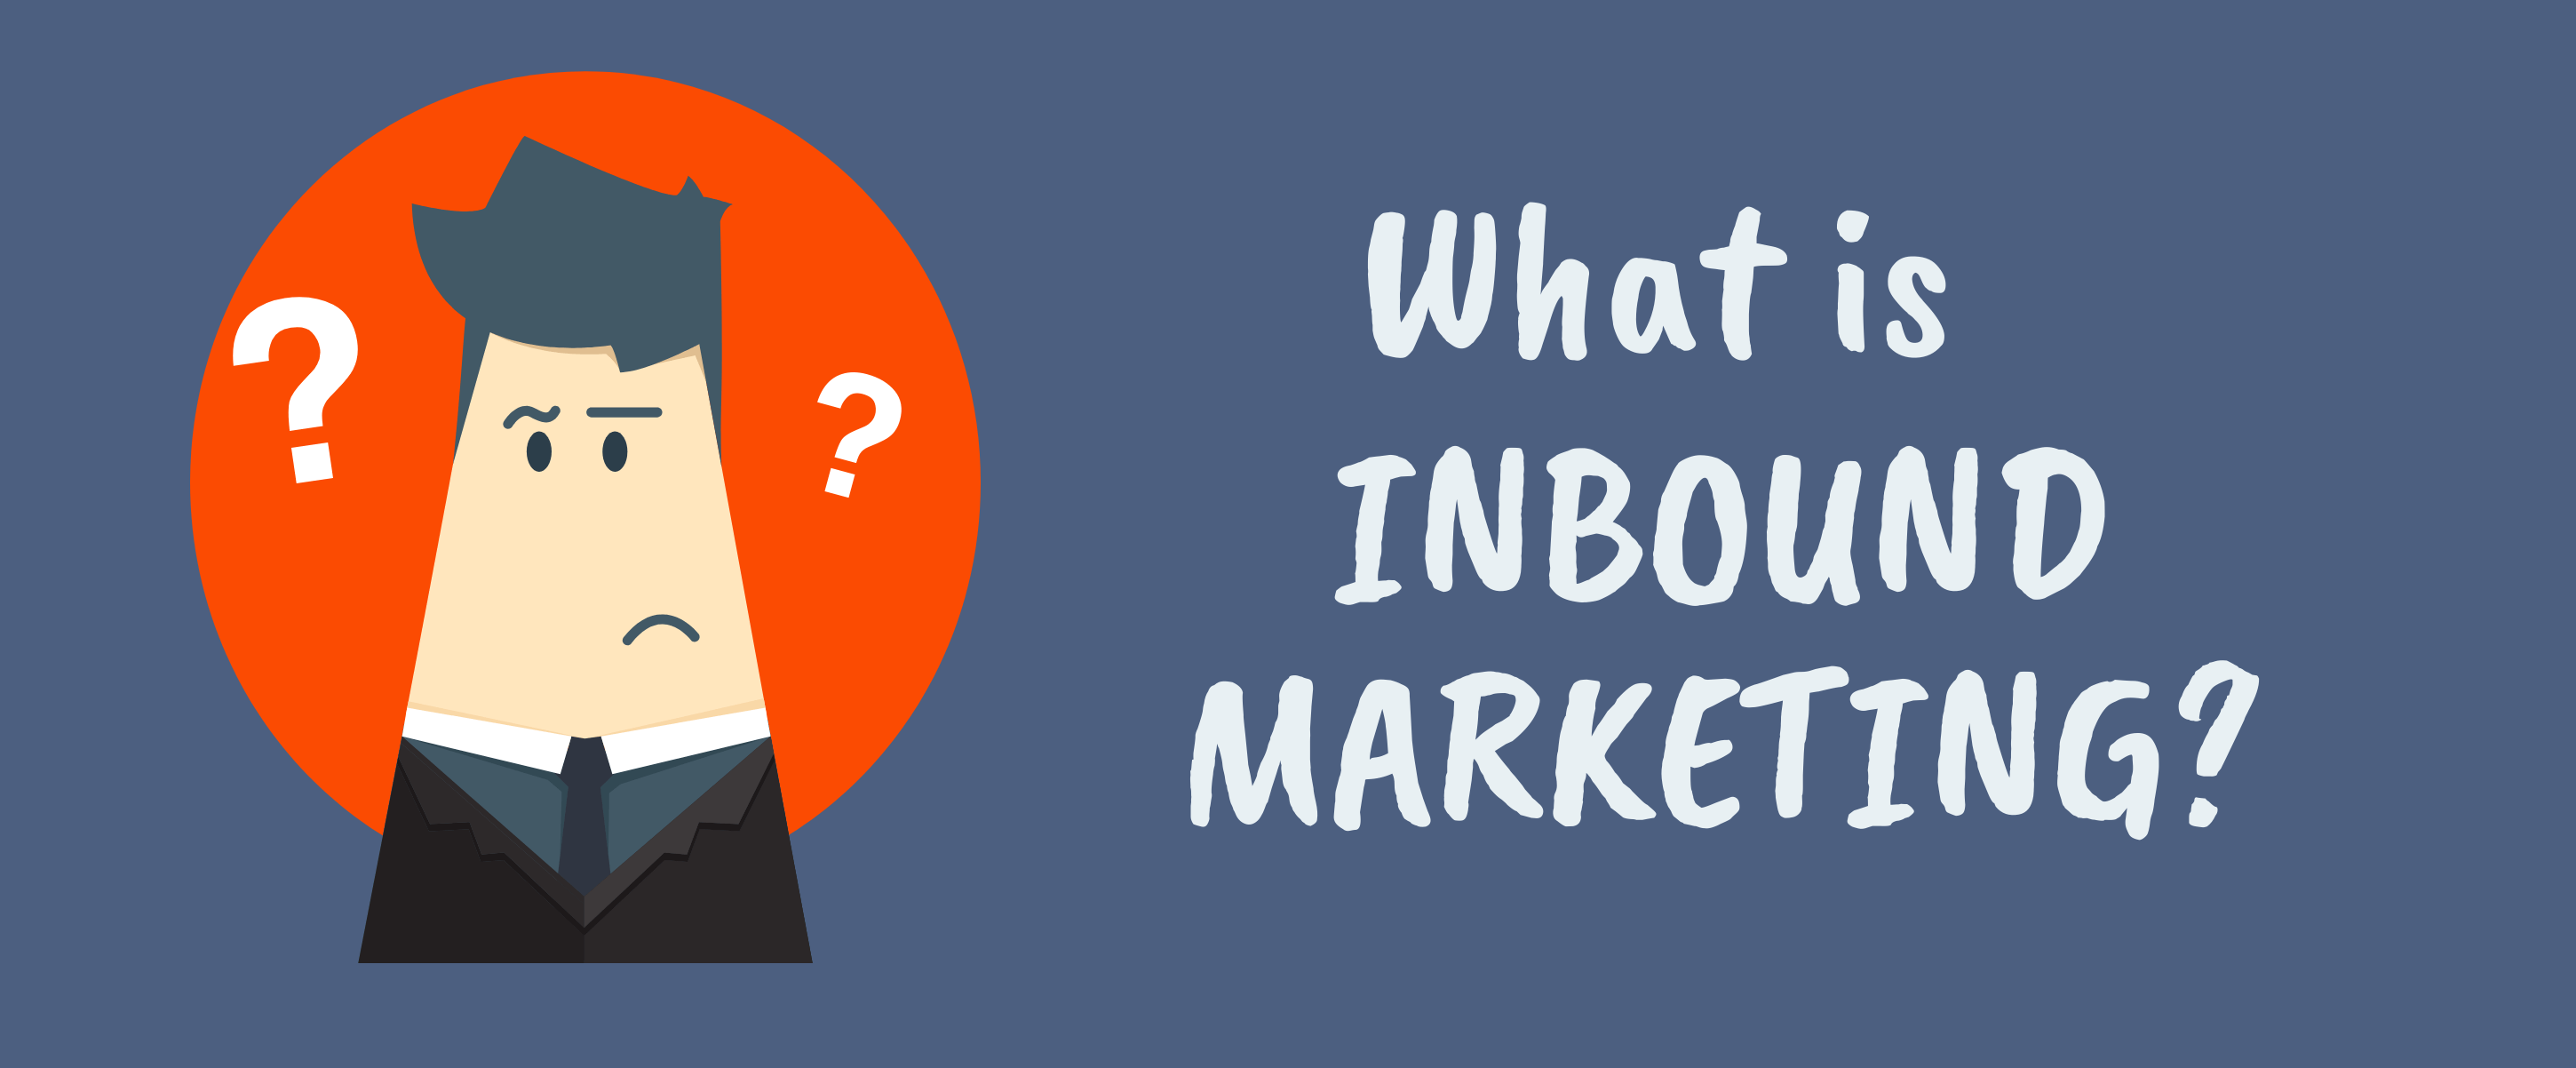
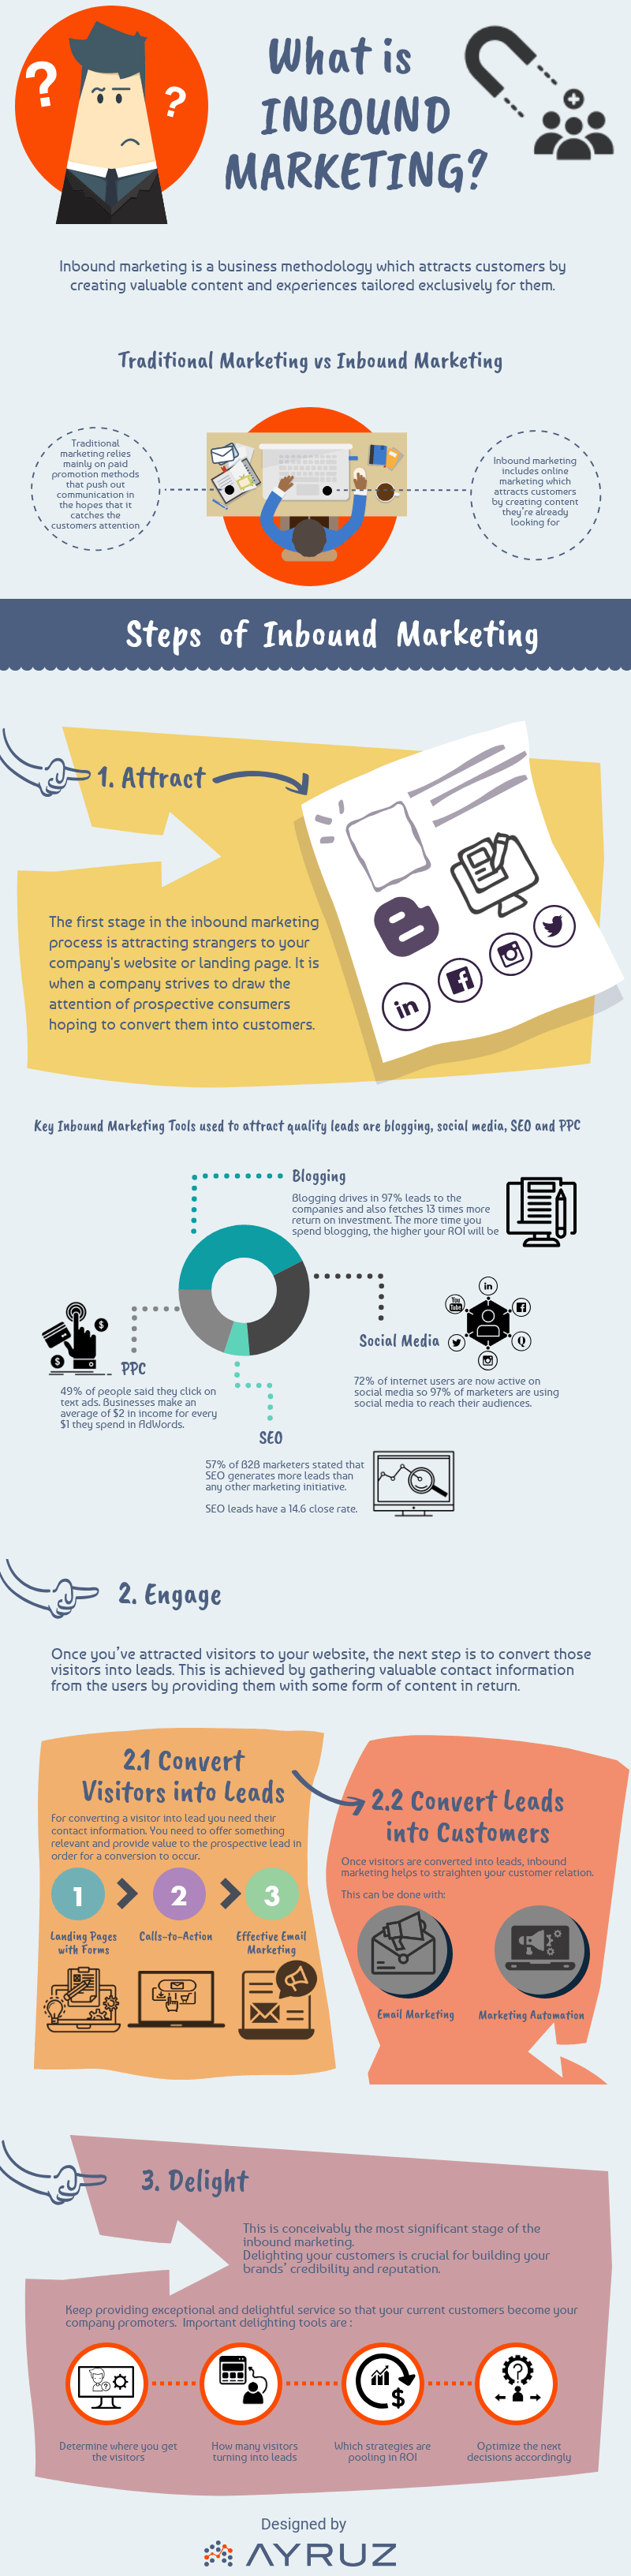
Inbound Marketing?
Are you fed up with the traditional marketing methods? Try out Inbound Marketing that attracts customers by creating valuable content, specially catered keeping them in mind and be visible to them when they’re trying to figure out answers to their queries. With the help of this infographic, you will get a brief idea of what inbound marketing is and get a grasp on how it will be beneficial for your business.
Want to understand more about Inbound Marketing? Get in touch with our inbound marketing expert for a free 30 minutes session.
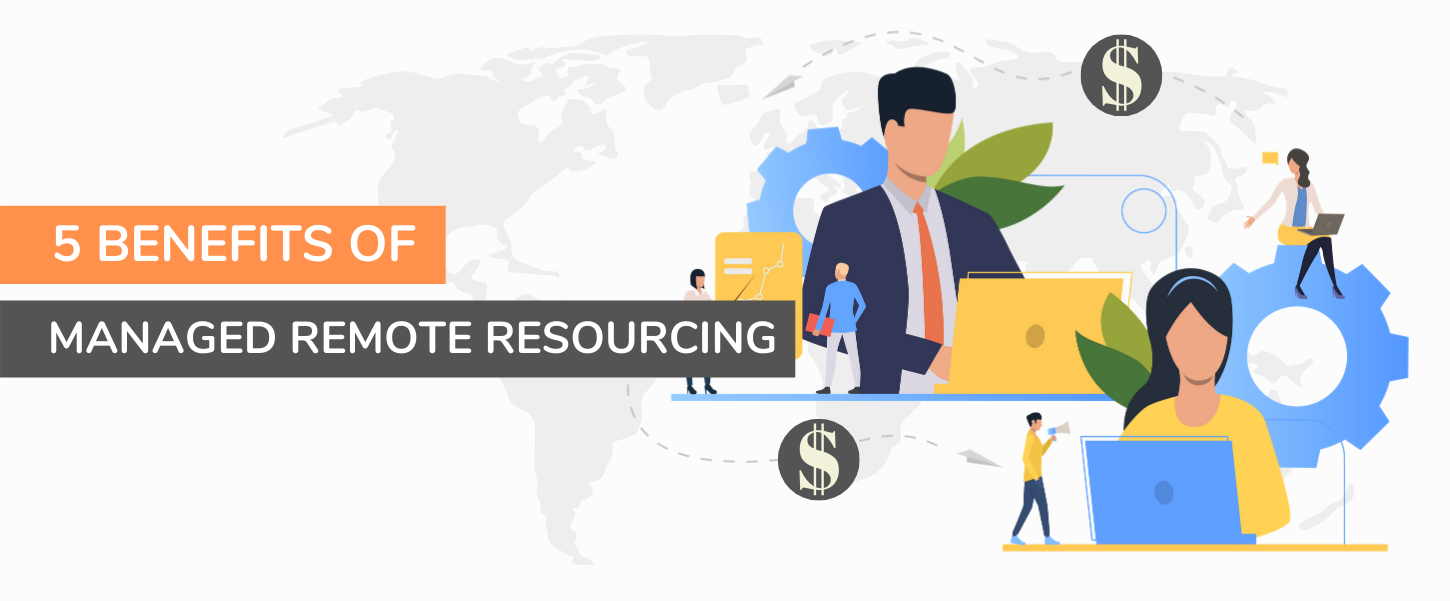
How Managed Remote Resourcing Helps You Save Big?
‘How to Save Money’ is a title that always looks interesting to everyone. From individuals to corporate companies, everyone is in pursuit of this. With the help of coupons, limited time offers, etc. individuals can save some from their retails. But for a company that is looking to fill a job position with a talented person, it doesn’t seem very easy. Hiring the right talent for the job and managing the talent is always a challenging task, and of course, yes, it will blast off a decent amount from your company budget too. However, by opting for Managed Remote Resourcing, you can always be one step ahead to achieve a cost-effective and hassle-free talent management.
What is Managed Remote Resourcing?
In simple words, we can say that Managed Remote Resourcing is the process of hiring and managing remotely working employees for a company. Agencies offering remote resourcing will take the burden of hiring and maintaining the employees for the company. It includes finding the right talent for the job, doing preliminary interviews for the company, creating a suitable work environment, and doing their payrolls for the company. The company need not take any headaches on the hiring and maintaining of their workforce.
Benefits of Managed Remote Resourcing
1. Reduced Business Cost

Maintaining an in-house team is always an expensive task for the company. From the hiring stage itself, the company has to set aside a considerable amount of money from its budget. There are chances to find difficulty in getting the right person for the job with the in-house HR team. Therefore, the next best alternative is to seek help from online platforms and professional agencies. And of course, they will hit us with their figure. Once you finalize the right fit for your job, comes the other major roadblock, you have to get a place for that person to work. Running & maintaining an office space is not as simple as it says. Sometimes a professional would be required to run the office space, and do the payrolls for the employees, which brings up the spent scale again.
By choosing managed remote resourcing, the company will get the perk of reduced running cost. No need to worry about the hiring cost, office expenses, payrolls, etc. The remote resourcing agency will do these tasks for the company. Getting the right person, giving a better environment to work are their responsibilities.
2. Reduced Employee Cost

A professionally skilled employee is always an asset to the company; however, the cost incurred is always high for that. Various studies have proven that for hiring and retaining an employee with the organization, the company will have to spend 125% of the actual salary. If it is a highly skilled resource, the cost might even go higher. Having a managed remote team set up where skilled resources are abundant will help to bring down the cost of hiring to a great extent.
3. Speed up the processes

Remote resourcing not only save your money, but it can also save a lot more time in the process of hiring and onboarding talents. Hiring in-house talents can be a time-consuming task. Searching and finding the best person for the job is the first step and it will take more time if you have a larger number of requirements. Once you find the person, you have to do interviews to vet the shortlisted candidates. Sometimes the number of interviews will be higher to vet them properly. Those who complete will meet the onboarding procedure. This stage got all the paper works and bank jobs. The time taken for all these will be more in most cases if you are dealing with the in-house HR team.
With managed remote resourcing, you can accelerate the speed of the entire process. There will be a dedicated team to handle each stage of the hiring process. The professionals will do the interviews and will do all the onboarding process on behalf of the company with a very short predetermined time period.
4. Improved productivity.

Office administration, payrolls, employees’ grievances are very tough to handle. Getting into these headaches can possibly make a slight shift from project goals. This will badly affect the productivity of each employee. When a remote resourcing agency handles all the running headaches, the company can completely focus on the project goals and lead them to achieve it. By providing a comfortable environment without any distractions can make a remote employee more productive. Also, a study showed that 53% of those who work remote has exhibited the tendency to work overtime while comparing with 28% of in house employees.
5. Global Talent Pool

It’s always hard to find the best fit for your job position. It will be even harder if you want a commuter with a specific skill set. If you go for remote resourcing, then you can reap the benefits of the global talent pool. Like in any other search, if you add more filter to the search you will end up with limited options. If you need a skilled commuter then definitely you will be stuck up with fewer candidates. But if you remove the commuter filter, then you can get a better talent pool and this is possible only with managed remote resourcing. You can find skilled employees from Philadelphia and Baltimore even if your company located in New York. And if you are short in a fund for the employee, then you could find the same skilled person from India on a lower pay scale too.
Managed Remote Resourcing won’t work in place there needed a hand on labor. If you do not fall into this category then remote resourcing can give you a great competitive advantage. Apart from the above advantages, it gives more flexibility in upscaling and descaling of the workforce with the help of an experienced team. The majority of employers agree that remote work has a great role to play employee retention. While considering all these points, undoubtedly we can say Managed remote resourcing can save big for your business.
If you are interested to explore more, feel free to download our white paper on Managed Remote Resourcing and understand how we can help you in achieving your business goals

Tips to Manage PPC Campaigns During the Covid19 Pandemic
The majority of commercial shops are in the state of shutting down across the country due to the spread of the Novel Coronavirus or Covid19. PPC advertising and digital marketing also changed overnight due to this pandemic. This situation will require advertisers to be brave, creative, and patient. Here, we are discussing some tips to help you better manage your campaigns during this crucial time.
Review your Marketing Spend

This is the best time to re-evaluate your marketing budgets. Review budget vs spend to find the unused funds and apply that fund to the campaigns that need it most. The most important metric for evaluating the success of the campaign should be the return on investment (ROI) or return on ad spend (ROAS). Consider shifting budget only to the relevant products or services during this emergency time. This helps the campaign to provide the maximum result. The fastest way to drain your PPC budget is to set display bids and corresponding campaign budgets too high and let them run without frequent optimization and review. To free up your account management task, consider setting lifetime or monthly spend limits, instead of daily budgets.
Monitor your Search Behavior

The COVID-19 pandemic has made retailers adapting to home delivery or online models, much of the workforce staying home, people are looking for clear, specific information about where, how, and when to get the things they need. Therefore, you can make use of specific ad copies, ad extensions where applicable to communicate benefits like free delivery, fast delivery, curbside pick-up, porch drop-off, etc.
Negative Keywords
There are a lot of major and minor changes in user queries that are triggering your ads. Because of which you must approach your campaigns in two different ways:
- In a reactive manner where you review search terms and display campaigns for COVID-19 keywords and content in real-time.
- React proactively by predicting which terms will trigger your ads and create negative keyword lists that can be used across all campaigns.
You can exclude keywords such as COVID, Coronavirus, Epidemic, Pandemic, etc if they are not relevant to your line of business.
Reconsider your Marketing Channels

Now that everyone is within the comforts of their home, people are consuming more news-related content, videos, and using online communication tools more than ever. Messaging on Facebook and its apps, Messenger and WhatsApp, have increased by 50% of its usage since the outbreak. Before the pandemic, users spent more time in WhatsApp and live streams, the messenger platform showed a decrease in ad revenue. However, with more people returning to Facebook and Messenger, there’s an opportunity for advertisers to increase their market share. Reaching more people at the top of the funnel with PPC and paid social media ads is an opportunity worth grasping.
Prepare for Normality

The tips discussed above are just quick fixes to ensure your campaigns are not affected negatively during the crisis. At a point in the near future, the restrictions will be lifted, albeit in parts. Consumer behavior will change to what it was and some sense of normality will occur. At that time, you will need to evaluate if things remain the same pre-outbreak if not, you will have to make adjustments to ensure that it is better than what was before. Therefore, be prepared for the future.
We’re all in for change over the next few months – both online and offline. While you’re stuck inside, keep an eye on your PPC accounts and keep your account’s performance healthy. If you require expert support with your PPC campaign during this outbreak, you will need a PPC agency you can trust.
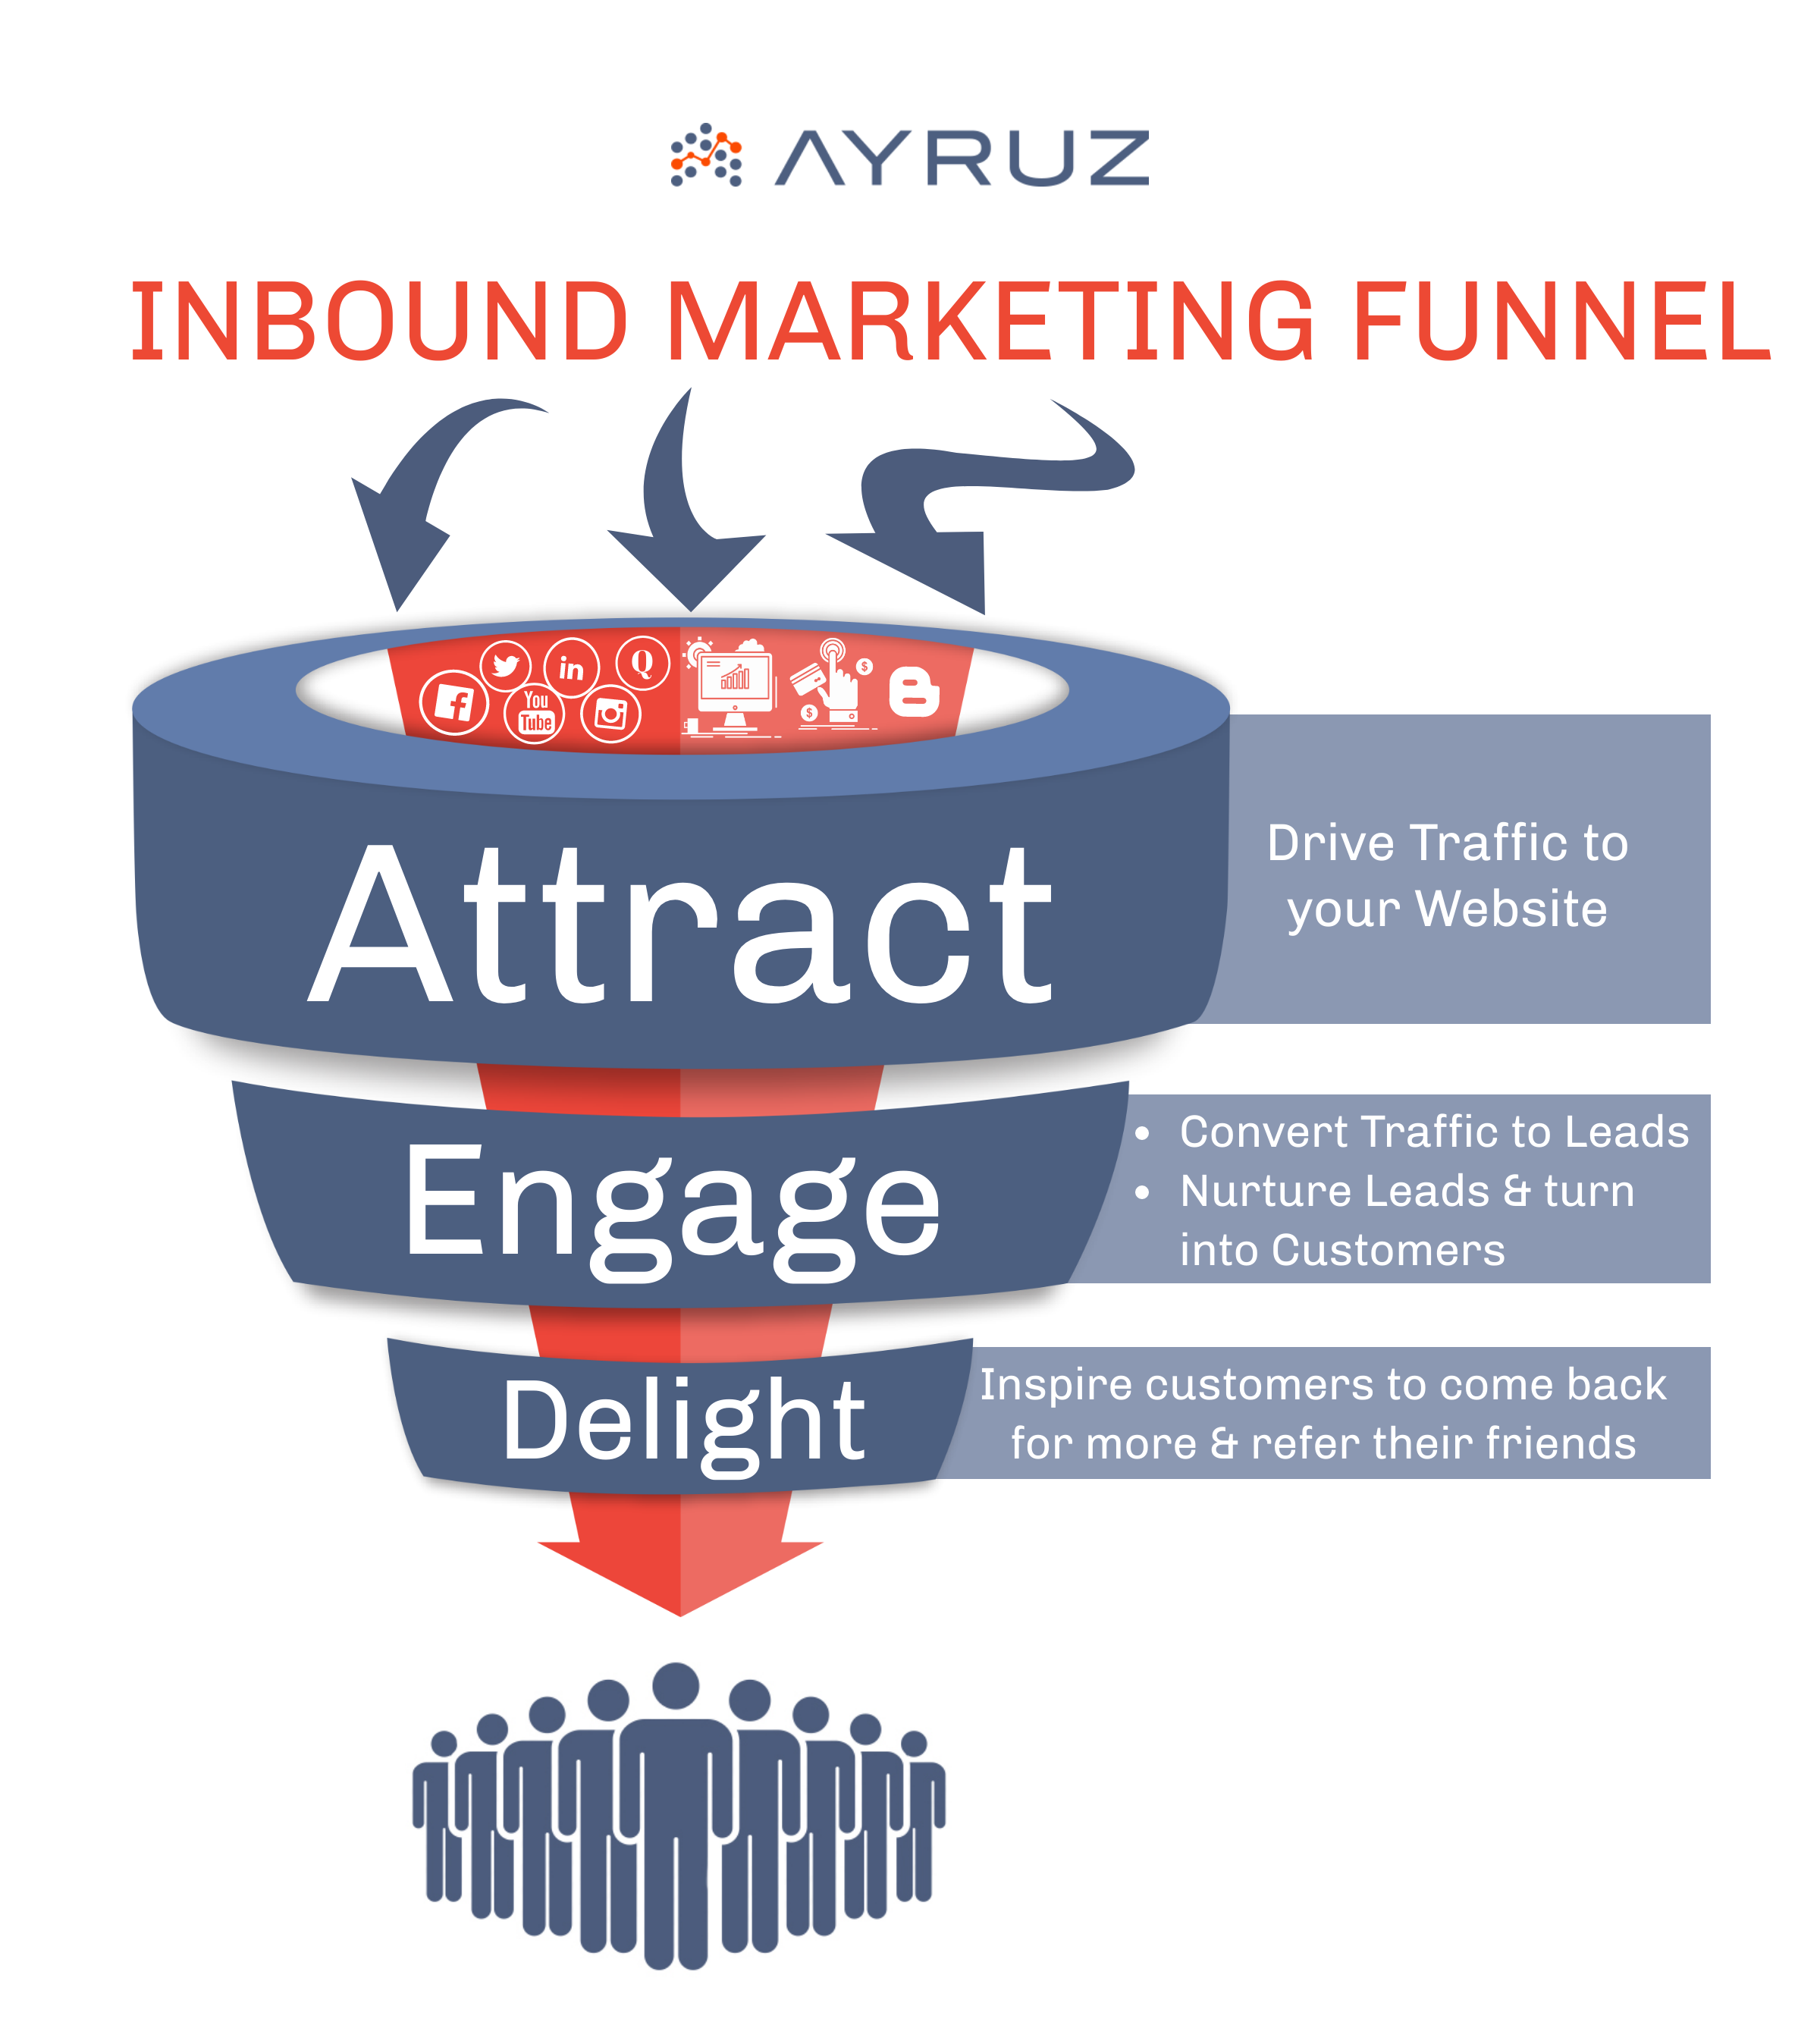
What To Know About Inbound Marketing Funnel? – Infographics
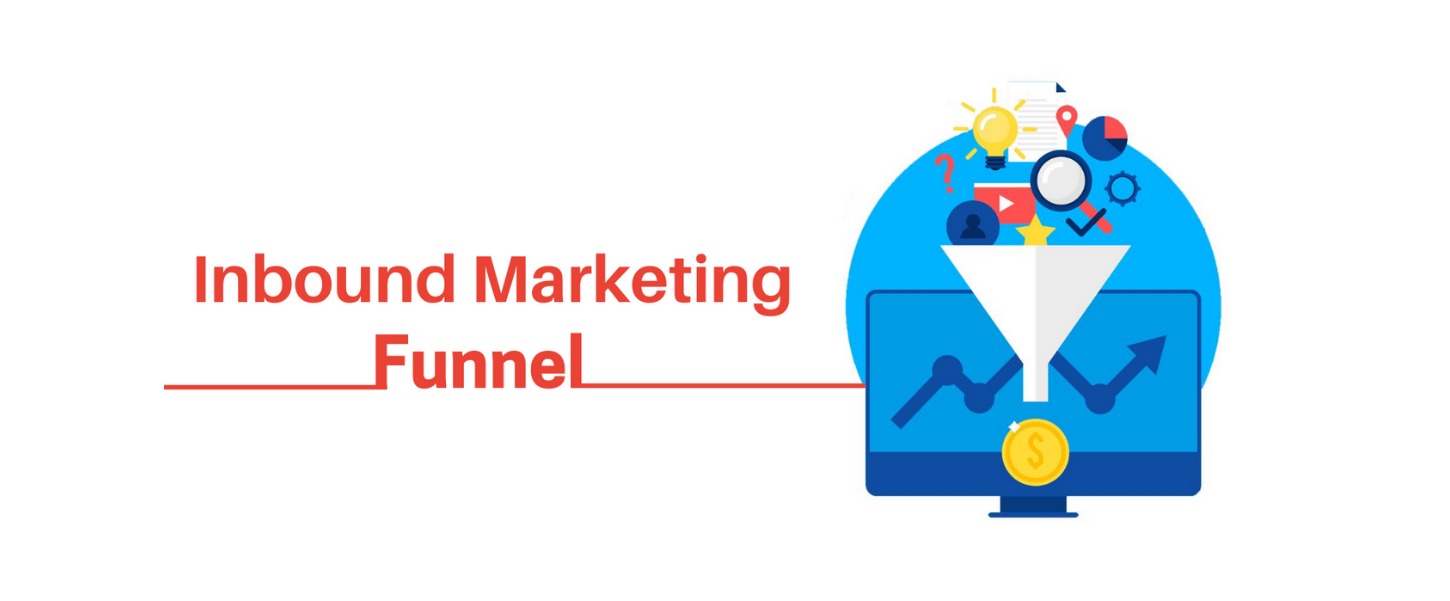
Most business professionals should be familiar with the concept of the funnel model. A digital marketing related counterpart of the same would be the Inbound Marketing Funnel. This model is a great way to represent the path of a prospect, to a lead, and finally to a customer, all the while tracking the entire sales process. It tells you what exactly the marketing message is supposed to be, and when and where to market those. The inbound strategy built on the funnel model works well as it equally benefits both the marketers as well as the clients. You can see the funnel-shaped model given below, which is broken up into three parts: To-Fu(Top of the Funnel), Mo-Fu(Middle of the Funnel), and Bo-Fu(Bottom of the Funnel).
5 Ways Brands Can Reinvent Their Digital Marketing Strategy
The rapid global spread of COVID-19 has been the biggest shock to the lives and livelihoods in nearly a century. Things have become particularly challenging for many businesses and startups as well. The pandemic puts forward an unprecedented outcome from shutting down the factories to the global stock market crash. However, as we’ve no cure found yet, the least we could do is get on embracing the new normality.
One of the critical revolutions that sprouted along digitalization was the scope of sales and marketing in digital space. Digital marketing provides an excellent way to either continue with your business’s functioning or start a new brand, even with less to no prior experience. With society adjusting to the new situations, it is necessary for the brands/businesses to re-strategize their mode of marketing around online platforms to reach more audiences and stand out from the competition.
In this blog, we’ll discuss a few ways to reinvent your marketing strategies:
1. Use social media platforms to connect with your target audiences

Whether you are an established businessman or a budding entrepreneur, opening accounts in all the major online social media platforms such as Facebook, LinkedIn, and Instagram will help you build prior connections with your target audiences. These interactions may not always mean that you get new customers. However, your brand or the services you provide may reach a bigger audience as a result of these.
You can also connect with your regular customers by showing your recent products or any newly added feature via social media platforms.
2. Be Innovative

Traditional marketing methods may not be successful in social media platforms, as there are millions of unique users in these. So plan innovative ways to reach out to the mass by understanding your target audiences’ geographical features and individual preferences. Attract them to your products or services so that your interactions will focus more on the audiences’ needs, which will result in a better chance of getting new customers. For brands, it is a unique opportunity to think outside the box and create innovative ideas that enable them to come forward and make a difference in this digital platform.
3. Rethink Offerings

A rapid change in consumer behavior and market dynamics pose a challenge when it comes to marketing your brand online. Hence, you must prioritize the customer experience now more than ever. As a responsible brand, take your audiences through your services and prove that you are a reliable source. Monitor brand communications all the time, and learn to quickly adapt to the changes required from the audience’s or buyer’s side.
4. Strengthen Your Digital Presence

According to Forbes, internet use has surged by 50-60% during this phase compared to regular times. People are using online platforms more than ever before. Hence, redesigning and enhancing your online presence is an effective way that might attract people to your brand. Engage with your targeted audience by various means such as collaborations, advertisements, and give-aways’/contests.
5. Solve Pertinent Issues

As a brand, you must also focus on reaching out to your existing customers to clear their queries and worries. This starts by informing your customers in a systematic way about how the pandemic will affect the way they avail your services or buy your products. Offer a sense of assurance before they come to you with queries, which will result in a long run customer relationship.
For the sustainable growth of your brand in the digital platform, you should also focus on the technical aspects of digital marketing. This includes monitoring the keyword rankings, increasing organic traffic, and regularly revising the content strategies concerning the situation around. Brands should focus more on the current situation than the general statistics, revenues, and returns, without losing their core service. After all, any brand’s primary responsibility is to provide real value to your customers, with empathy and compassion.
Search Engine Optimization: A Complete Guide – Infographics
SEO, short for Search Engine Optimization, is the practice of improving the ranking of a website on search engine results pages (SERPs). In an age where everything from relationships to businesses is connecting digitally, the need to stand out and win the race against the competitors is notably high. Considering such a scenario, a brand adopting a digital store can only flourish by organic growth, which can be achieved by applying SEO strategies.
When SEO strategies are precisely applied while designing your website, the chances of ranking increases, resulting in greater visibility among the users and targeted audience. Following the right SEO tactics will tremendously help in the growth of your business/brand. Learn more about the various essential things that you need to get started with SEO from the infographics given below.


Death of 3rd-Party Cookies: How to convert 3rd-party cookies to 1st-party?
I presume, by now, you are already aware that the 3rd-party cookies are being killed. Mozilla has axed 3rd-party cookies on Firefox (RIP: September 3, 2019), and Apple followed suit on the Safari browser (RIP: March 24, 2020). Both block all 3rd-party cookies by default to accentuate user privacy.
Google has also taken an important step toward user privacy to depreciate 3rd-party cookies by the end of 2023.
Not just web browsers, Apple’s April 2021 iOS update 14.5 featured a new consent protocol called App Tracking Transparency (ATT) that gives iOS users more control of how apps track their behavior across other companies’ apps and websites.
Apple devices have a unique number- the advertising identifier that can be used to uniquely identify your device for the purposes of ad targeting and tracking. Apple’s ATT governs and regulates how apps and advertisers can use uniquely identifiable data to target, measure, and optimize campaigns.
All of these are the aftermath of the data protection and privacy regulations like the GDRP and CCPA to curb the invasive digital marketing behavior from brands that the digital consumers have endured thus far.
That said, there are a lot of brands that understood such consumer frustrations long back and pioneered in creating refined customer experiences at moments that matter, non-intrusively for their audience. But the digital consumers were still out in the open with most brands who did not respect consumer data and privacy, and then came the iron hand, the data protection regulations.
- Now that the 3rd-party cookies are being killed, how can brands measure in the cookieless world?
- What is the use of Google Tag Manager (GTM) Server-Side Tagging?
- How can GTM Server-Side Tagging help you stay compliant with GDPR and CCPA?
- What are the benefits of GTM Server-Side Tagging?
- What are the additional benefits of GTM Server-Side Tagging?
What is the use of Google Tag Manager (GTM) Server-Side Tagging?
Currently, most of the measurement tags are served via the client-side, from the user’s web browser using tag management solutions like Google Tag Manager (GTM). With this model, the user’s browser directly interacts with 3rd-party analytics services, making the cookies stored in the user’s web browser 3rd-party cookies.
On the other hand, the Google Tag Manager (GTM) Server-Side Tagging helps you run your measurement tags on the brand’s cloud server (server-side) via GTM Server-Side Tagging and a cloud platform like Google Cloud Platform (GCP) instead of running the tags directly on the user’s web browser (client-side).
Client-Side Tracking In Action
Server-Side Tracking In Action
How can GTM Server-Side Tagging help you stay compliant with GDPR and CCPA?
As we have seen, the GTM Server-Side tagging brings an intermediary cloud server (owned by the brand) between the user’s browser and the 3rd-party analytics service.
So, there are no 3rd-party cookies being generated in this process on the user’s browser. The cookies generated are 1st-party cookies.
With the GTM Server-Side Tagging, you can effectively convert your 3rd-party cookies to 1st-party cookies, and you can stay compliant with data protection regulations like GDPR and CCPA.
Beyond this, GTM Server Side Tagging Implementation also brings other benefits for the brand and the brand’s audience. Let us see them too.
What are the benefits of GTM Server-Side Tagging?
On the tracking front, the Google Tag Manager Server-Side Tagging helps you circumvent tracking restrictions that are in place for 3rd-party cookies and offer reliable tracking.
On the measurement front, the Google Tag Manager Server-Side Tagging helps you bridge the blinding data gaps in the conversion paths that brands have faced historically, making it difficult for them to properly understand the customer’s purchase journey, and advertise and engage with them profitably.
Not just these, the GTM Server-Side Tagging brings brands a bouquet of additional benefits that can critically impact the experience of your customers and your target audience. Let us take a look at some of the additional benefits of implementing GTM Server-Side Tagging.
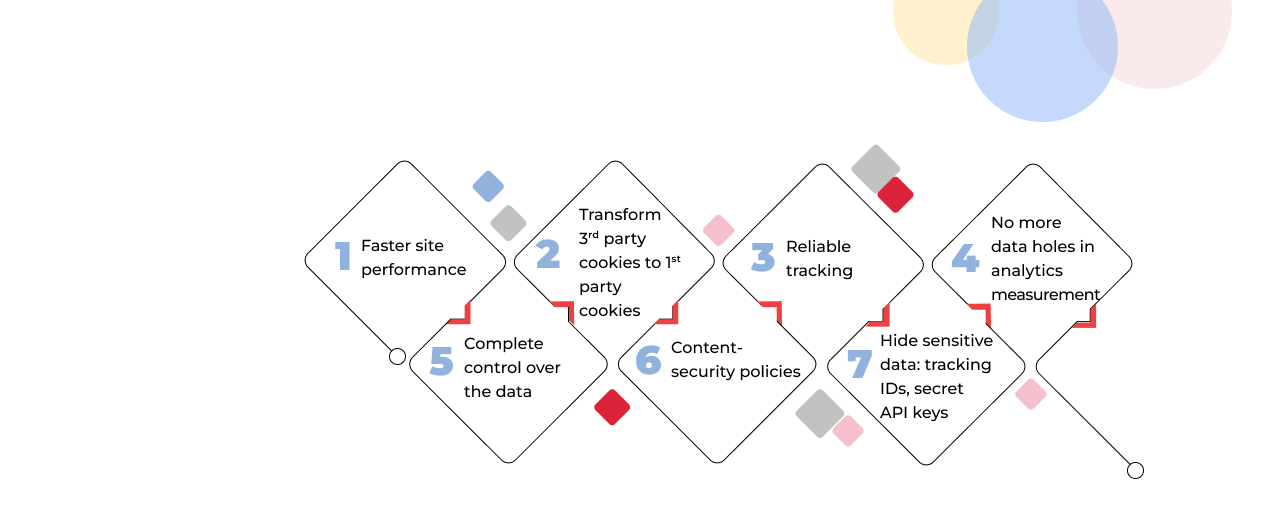
What are the additional benefits of GTM Server-Side Tagging?
- Faster site performance
- Transform 3rd party cookies to 1st party cookies
- Reliable tracking
- No more data holes in analytics measurement
- Complete control over the data
- Content-security policies
- Hide sensitive data: tracking IDs, secret API keys
Download our free whitepaper on GTM Server-Side Tagging
Are concerned about the technical gaps you have on the matter?
Not to worry, we have a free whitepaper for you on the matter- all about the killing of 3rd parry cookies and how you can measure and engage with your customers in the cookieless world.
If you still need help with your GTM implementation, our team can help. Enter the cookieless world body with GTM server-side tagging.
We have end-to-end Google Tag Manager Server-Side Implementation, migration & maintenance experience.
You are in good hands. We have helped startups to Fortune 500s for their analytics, measurement, and digital transformation journey.
Talk to us for a free consultation today.
Improve the page-load speed of your brand website with Google Tag Manager Server-Side Tagging
If your brand is all about providing a great experience for your audience, then you understand the importance of a faster loading website like we do.
Page Load Speed Matter: Here’s Why
Slower loading websites hurts the user experience, your brand experience, especially if they have landed on your website the very first time- a new user, your potential customer. It also considerably impacts your key metrics, and the ROI from your paid campaigns.
Let us take a look at some key stats from Google to corroborate. According to a research conducted by Google if a website takes more than 3 seconds to load, 53% of users will leave, and Google estimates that on an average it takes 22 seconds to fully load a mobile landing page.
How Google Tag Manager Impacts Page Speed
Thanks to Google, when the first version of Google Tag Manager was released, brands and marketers were happy about the critical impact it can offer on page load speed by implementing tags from Google Tag Manager. GTM cut the need for tracking scripts to be hard-coded, but could be fired directly from the GTM container.
How Google Tag Manager Server-Side Impacts Page Speed
Now, you can fire up your website to load even faster with the Google Tag Manager Server-Side Tagging. You can do this when you move your GTM tags from the Client-Side Tagging to GTM Server-Side Tagging.
If you would like to explore the difference between Client-Side tagging and Server-Side tagging, you may head over here.
How does GTM Server Side Tags speed up your website?
Let us explore how GTM Server Side Tags can help speed up websites when you migrate from GTM Client-Side tagging or the old-school hard-coded tracking implementation. You need to be aware that, if you choose to combine both server-side tracking and browser/ client-side tracking, you will not be able to see any page speed improvement.
The server container feature that Google rolled out for Google Tag Manager and Tag Manager 360 in 2020 allows brands and marketers to move their tracking and measurement tags to a server container hosted in the cloud. With this implementation websites can load faster, tracking will be more accurate, and brands can ensure they are compliant with regulations like GDPR and CCPA, ensure more data protection, and more.
Historically, tracking and measurement tags are loaded directly on the user’s web browser (Client-Side tagging), and when you move all the client-side tags to the cloud server, that will help your brand website to load faster on the user’s browser, impacting their brand experience and other key conversion metrics that matter for your brand.
Additionally, Google Tag Manager Comes with a host of additional benefits besides speeding up your website. You can head over here to understand all the key pain-points that GTM Server-Side Tagging can help you fix and the benefits of using GTM Server-Side Tagging.
If you would like to understand more about:
Google Tag Manager Server-Side Tagging and how it can impact your brand
Tracking and Measurement in the Cookie-less world now that third-party cookies will be killed entirely in 2023, you may download our free whitepaper here.
Universal Analytics to Google Analytics 4 Migration and its common mistakes
One significant transition many businesses are currently undertaking is migrating from Universal Analytics to Google Analytics 4 (GA4). Google Analytics 4 is the latest version of Google’s analytics platform, providing businesses with enhanced features and benefits.
Here is the step-by-step process for seamlessly migrating from Universal Analytics to GA4.
Step 1: Familiarize Yourself with GA4 Before starting the migration process, it’s essential to understand the critical differences between Universal Analytics and GA4. GA4 is more customer-centric, focusing on events and user interactions rather than page views. In addition, it offers enhanced cross-platform tracking, machine learning-powered insights, and a privacy-centric approach. Familiarize yourself with the new terminology and concepts in GA4, such as data streams, events, and parameters, to ensure a smooth transition.
Step 2: To set up a new GA4 property to migrate to GA4, we must create a new property in the Google Analytics account; it will allow data collection in GA4 while maintaining the existing Universal Analytics property for historical data. First, open your Google Analytics account and navigate to the Admin section. Under the Property column, click on “Create Property” and select “Web” or “App” depending on the platform—the new GA4 property, including configuring data streams and defining the measurement settings.
Step 3: After setting up the GA4 property, you must update the tracking code on the website or app to send data to GA4. You can achieve this by using Google Tag Manager. The tracking code format of GA4 differs from that of Universal Analytics. Thus, it is necessary to substitute the current tracking code with the new GA4 tracking code. The process may demand alterations to the website’s code or the app’s SDK. If required, involve the development team. Ensure to thoroughly test the updated tracking code and ensure the data is collected accurately in GA4.
Step 4: Configure Data Streams and Events Data streams and events are the foundation of tracking data in GA4. Data streams allow us to define specific data sources or streams, such as website traffic or app usage, and events are the actions or interactions we want to track, such as page views, clicks, or conversions. Configure the data streams and events in GA4 based on the business objectives and tracking requirements. We can use the GA4 interface or the Measurement Protocol to send events directly to GA4 from the website or app.

Step 5: Set Up Custom Reports and Dashboards; GA4 offers a new reporting interface with updated features and visualization options. Take advantage of setting up custom reports and dashboards that align with the specific goals and metrics. This may involve recreating or modifying the existing Universal Analytics reports suiting the GA4 reporting format. In addition, utilize GA4’s machine learning-powered insights and data visualization options to gain meaningful insights and share reports with the team and stakeholders.
Step 6: Monitor and Optimize After migrating to GA4, monitoring the data and optimizing the tracking settings is crucial. Review the data regularly to ensure that it is accurate and meets expectations. Take advantage of GA4’s advanced features, such as machine learning-powered insights and predictive modeling, to uncover new opportunities for optimization. Continuously refine the tracking strategy based on data-driven insights and make adjustments as necessary to improve the analytics performance.
List of common mistakes to avoid during the UA to GA4 migration process:
- Not planning for data loss: The data model of GA4 differs from UA, implying that GA4 will not automatically transfer all UA data. For example, GA4 may not have direct equivalents to UA’s custom dimensions, metrics, and segments and may not retain historical data entirely. It’s vital to thoroughly review the differences between UA and GA4 data models and plan for potential data loss or discrepancies during migration.
- Neglecting to update tracking code: GA4 requires a different tracking code format than UA. One common mistake is not updating the website or app tracking code to the new GA4 format, which can result in data collection issues and incomplete or inaccurate reporting in GA4. It’s vital to update the tracking code on all relevant pages or apps during migration.
- Neglects to set data retention: In GA4, you can configure data retention settings to determine how long the GA4 property will retain user-level and event-level data. If you do not set up the data retention settings correctly, the data may get automatically deleted after the default retention period of 14 months. This can lead to losing important historical data and hinder the ability to perform long-term analysis, track trends, or compare data over time. It’s important to review and set data retention settings according to the organization’s policies to ensure that valuable data is retained for the desired period and remains accessible for analysis and reporting purposes.
- Setting up where to store raw data: GA4 allows one to choose between two options for keeping the raw data: BigQuery, a cloud-based data warehouse, or the default storage in GA4. Storing raw data in the default GA4 storage, which has limitations on data access, analysis, and customization, can happen if you do not configure this setting correctly. Storing raw data in BigQuery provides more flexibility and scalability for advanced data analysis, custom data queries, and data integration with other business intelligence tools. It’s important to carefully consider and configure the storage location for raw data in GA4 to ensure that it aligns with the organization’s data strategy and enables efficient data analysis and utilization.
- Duplicate tags: GA4 allows to set up tags, which are snippets of code that collect data from the website or app and send it to GA4 for analysis. However, mistakenly duplicating tags can lead to data discrepancies and inaccurate reporting. Implementing the same tag multiple times on a page or app can send duplicate data to GA4, inflating metrics and providing incorrect insights. Additionally, duplicated tags can cause conflicts, such as multiple tags firing simultaneously, resulting in data loss or incomplete data capture. It’s essential to carefully review and manage the tags in GA4 to avoid duplications, ensure accurate data collection, and maintain reliable reporting for effective data-driven decision-making.
- Overlooking data governance and privacy considerations: GA4 includes additional data governance and privacy features, such as the ability to configure data deletion, consent settings, and data retention periods. Failing to configure these settings during the migration process properly can result in non-compliance with data protection regulations or incorrect data handling, which can have legal and reputational implications.
- Not reviewing and updating existing integrations: If you have third-party integrations with GA, such as CRM systems, advertising platforms, or other data sources, it’s important to review and update these integrations during the migration to GA4. Some integrations may require updates or modifications to work with GA4, and failing to address these changes can result in data gaps or discrepancies in the reporting.
- Not updating reporting and analysis processes: GA4 introduces new features and changes to reporting and analysis compared to UA. One common mistake is not updating internal processes and training materials for reporting and analysis to reflect these changes. Educating the team on the differences between UA and GA4 reporting and analysis and updating any documentation or training materials accordingly is essential.
- Skipping testing and validation: As with any migration, it’s crucial to thoroughly test and validate data in GA4 after the migration process to ensure accuracy and reliability. Skipping this step can result in missed data discrepancies or inaccuracies that may go unnoticed. Conduct thorough testing and validation of the GA4 data to ensure it aligns with the expectations and business requirements.
If you’re working with a GA4 agency to migrate from UA to GA4, it’s essential to communicate with them about these common mistakes to ensure they are avoided during the migration process. Collaborating with a GA4 agency can provide expert guidance and support throughout the migration process, but it’s still important to be aware of potential pitfalls. Avoiding these common mistakes and carefully planning and executing the migration process can help ensure a smooth transition from UA to GA4 and maximize the value of the analytics data in the long run. With the right approach and support from a GA4 agency, you can make the most of this powerful analytics platform and unlock new insights into your business.
How to find event parameters in GA4?
The GA4 is a highly effective analytics platform that offers useful information on how users interact with websites and mobile applications. One of its key features is the ability to track events, which are user interactions or actions you want to monitor. Understanding GA4 event parameters is crucial for gaining deeper insights into these actions and optimizing your tracking strategy. This article will explore the steps to find event parameters in GA4 and their significance.
There are different kinds of events that can be automatically collected or implemented in Google Analytics for your website or app:
Automatically collected events:
These events are collected automatically when you initially set up Google Analytics on your website or app.
Enhanced measurement events:
When you enable enhanced measurement in Google Analytics for your website or app, these events are collected along with the automatically collected events.
To view and analyze certain types of events in Analytics, you need to implement them specifically:
Recommended events:
These events have predefined names and parameters, and it is recommended that you implement them. You can access existing and future reporting capabilities in Analytics using these events.
Custom events:
These events are events that you define yourself. They should be created only when the predefined events do not suit your needs. Custom events may not appear in most standard reports, so you need to set up custom reports or explorations for meaningful analysis of these events.
Real-Time Event Collection in Analytics:
Ensuring Successful Collection of Events from Your Website or App.
Real-Time Report:
The Real-Time Report displays the number of times your website or app users have triggered each event within the last 30 minutes. You can see the specific event names and the corresponding count of triggers. In addition, you can view the parameters associated with an event by clicking on an event.
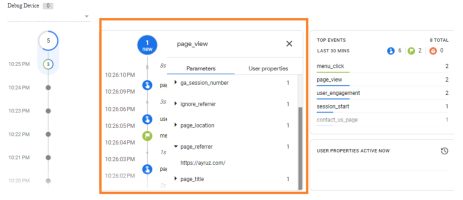
Debug View Report:
The Debug View Report allows you to see all the events a single user triggers. This report helps confirm if you have correctly set up an event and its parameters. Before using this report, you need to enable debug mode.
How Does GA4 Track Event Parameters?
In Google Analytics, you can send events with additional details called parameters. Parameters provide extra information about the event. For instance, when the “page_view” event is sent to your reports, it includes parameters like “page_location” and “page_referrer” The “page_location” parameter shows the URL of the page someone viewed, while the “page_referrer” parameter shows the URL of the previous page they visited. Here’s an example of how a “page_view” event appears in Google Analytics, along with its parameters. In addition, Google Analytics will automatically send parameters with each event. These can include:
- The ga_session_id parameter includes the unique identifier assigned by Google Analytics for the user’s session.
- The page_location parameter sends the URL of the page currently being viewed.
- The page_title parameter sends the title of the page currently being viewed.
- The page_referrer parameter sends the URL that someone viewed before the current page. This can include other pages on your website or third-party websites (if someone clicked through to your website from another website).
For events automatically tracked by Google Analytics, additional parameters are also sent.
Automatic Events in Google Analytics 4:
Once you include the Google Analytics 4 tag on your website, it will automatically monitor various events whenever someone visits a page. As an illustration, Google Analytics will automatically track an event when a person spends a minimum of 10 seconds on your website. Events tracked automatically include:
| Event Name | Description |
|---|---|
| Page View | Tracked when a user visits a specific page on your website or app. |
| Screen View | Recorded when a user navigates to a specific screen in your mobile app. |
| Event | Captures various predefined events such as button clicks or form submissions. |
| Ecommerce | Tracks transaction-related events, including purchases and product interactions. |
| User Timing | Measures the time taken for specific user actions or processes. |
| Social Interaction | Captures interactions with social media buttons or shares. |
| Exception | Records errors or exceptions encountered during user interactions. |
| Ad Click | Captures user clicks on advertisements displayed on your website or app. |
| Ad Conversion | Records when a user completes a goal or conversion related to an advertisement. |
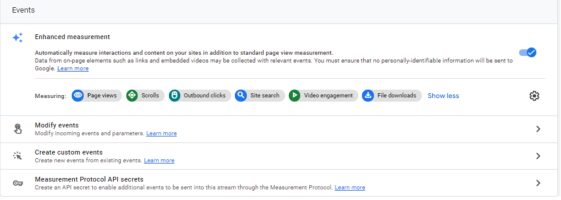
Enhanced event measurement:
Enhanced measurement lets you track user interactions with your content by activating events within the Google Analytics interface. Again, no coding is necessary for this setup. Once you enable these options for a web data stream, your Google Analytics tag will immediately start sending events.
To enable or disable enhanced event measurement in Google Analytics, follow these steps:
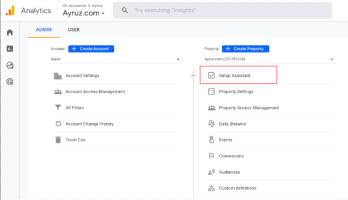
Ensure that you are in the correct account and property. (Refer to the image below)
- Open Google Analytics and click on “Admin.”
- Click “Data Streams” in the Property column and select “Web.”
- Look for the “Enhanced measurement” section and slide the switch to the “On” position to enable all available options.
- Click “Settings” to customize individual options per your requirements if needed.
- You can also turn off specific measurement options in settings.
Here’s an example table showcasing different types of measurement events in Google Analytics 4 (GA4):
| Event Name | Description |
|---|---|
| Page View | Tracked when a user visits a specific page on your website or app. |
| Scroll | Captures when a user scrolls through a webpage or app screen. |
| Click | Records user clicks on specific elements like buttons or links. |
| Video Start | Triggered when a user starts playing a video on your website or app. |
| Video Complete | Captures when a user finishes watching a video. |
| Form Submit | Tracks when a user submits a form on your website or app. |
| Purchase | Recorded when a user completes a purchase transaction. |
| App Open | Tracked when a user opens your mobile app. |
| App Update | Captures a user update your mobile app. |
| Error | Trigger when an error occurs on your mobile app. |
Recommended events:
Adding these events to your website or mobile app allows you to measure more features and user behavior, resulting in more useful reports. However, these events are not sent automatically because they need additional information to be meaningful.
Here are some examples of recommended events in Google Analytics 4 (GA4), categorized by different aspects:
E-commerce Events:
| Event Name | Description |
|---|---|
| view_item | Tracked when a user views a specific item in your online store. |
| add_to_cart | Recorded when a user adds an item to the shopping cart. |
| remove_from_cart | Captures when a user removes an item from the shopping cart. |
| begin_checkout | Tracks when a user initiates the checkout process. |
| purchase | Captures when a user completes a purchase transaction. |
| refund | Recorded when a user requests a refund for a purchase. |
| view_promotion | Tracked when a user views a promotional offer or discount. |
| select_promotion | Captures when a user selects a specific promotion or coupon. |
Content Engagement Events:
| Event Name | Description |
|---|---|
| Page_view | Tracked when a user views a specific page on your website or app. |
| Scroll | Captures when a user scrolls through a webpage or app screen. |
| video_start | Recorded when a user starts playing a video on your website or app. |
| video_complete | Tracked when a user finishes watching a video. |
| search | Captures when a user performs a search on your website or app. |
| share | Recorded when a user requests a refund for a purchase. |
| comment | Tracked when a user leaves a comment on your website or app. |
| rating | Captures when a user rates or reviews a product or content. |
Conversion and Lead Generation Events:
| Event Name | Description |
|---|---|
| sign_up | Tracked when a user signs up or creates an account. |
| login | Captures when a user logs in to their account. |
| submit_lead | Recorded when a user submits their information for lead generation. |
| begin_checkout | Tracked when a user initiates the checkout process. |
| add_payment_info | Captures when a user adds payment information during checkout. |
| subscribe | Recorded when a user subscribes to a service or newsletter. |
| complete_registration | Tracked when a user completes the registration process. |
Custom Events in Google Analytics 4:
Custom events in Google Analytics 4 (GA4) are events that you define based on your specific tracking needs. Unlike predefined events, custom events allow you to track and measure unique interactions or actions specific to your website or app. For example, you can define custom events to capture user behavior, conversions, engagement, or any other meaningful actions relevant to your analytics goals. Make sure the name of the custom event is not a reserved name.
By defining and implementing custom events, you can gain deeper insights into user behavior, evaluate the success of specific actions or campaigns, and tailor your analytics tracking to align with your unique business requirements.
Here are some examples of custom events in GA4:
- Video_play: Tracks when a user starts playing a video on your website or app.
- Newsletter_subscribe: Captures when a user subscribes to your newsletter.
- Contact_form_submit: Recorded when a user submits a contact form on your website.
- Add_to_wishlist: Tracked when a user adds a product to their wishlist.
How to setup custom event in GA4:
Tag Manager: Using Google Tag Manager, you can create custom events by creating a new tag and configuring it to fire when a specific action or event occurs on your website or app. This lets you track custom events without modifying the website’s code directly.
Step 1: Create a GA4 Event tag to begin
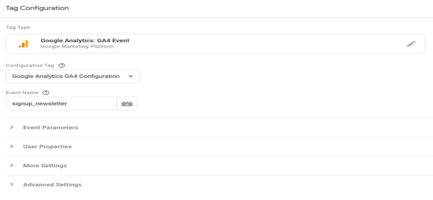
Generate a Google Analytics: GA4 Event tag specifically for the custom event you wish to track.
- In Google Tag Manager, access the Tags section by clicking on the Tags icon (depicted as an image).
- Choose the “New” option. Provide a name for the GA4 Event tag (e.g., “GA4 Event – Signup newsletter”).
- Select “Google Analytics: GA4 Event from the available options.
- Choose the appropriate Google Analytics: GA4 Configuration tag within the Configuration Tag.>
- Enter a name for the event in the Event Name field (e.g., signup_newsletter).
This will establish a new custom event; its designated name will be visible in your GA4 reports.
Step 2: Create a trigger to send the event when someone clicks the button.
Select the Triggering option within your GA4 Event tag.
- Click +on the top right.
- Enter a name for the trigger (e.g., “Trigger – Signup newsletter”).
You have the flexibility to specify the conditions for triggering the event. The event is sent based on the button label in this particular example.
- Click the Trigger Configuration box in your trigger.
- Choose All Elements./li>
- Click Some Clicks.
- Set the trigger condition: “Click Text contains Sign up for the newsletter”.
- If you don’t see Click Text, click the first drop-down and select Choose Built-In Variable. From the menu, select Click Text.
- Save all your changes.
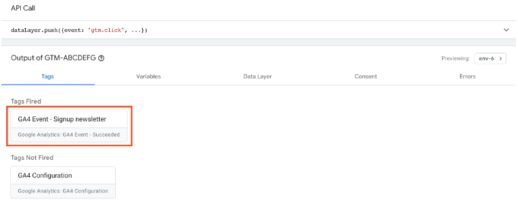
Step 3: Before publishing your new event in Tag Manager, click Preview to see the data recorded when you click the “Sign up for the newsletter” button. When you are ready to publish your changes, click Submit.
GA4 Event Reports: Analyzing Event Data in Google Analytics 4:
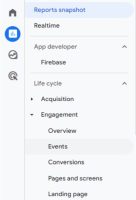
To access event reports in GA4, follow these steps:
- Go to your GA4 property.
- Click on the “Reports” tab to enter the reporting section.
- Within the reporting interface, find and select the “Engagement” category.
- Look for the “Events” option and click on it to access the event reports.
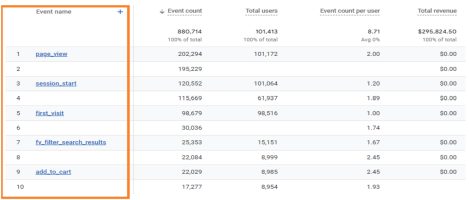
In the GA4 reporting view, you can view a comprehensive list of all your logged events.
You can find out how many times each logged event was triggered.
Limitation of setting up events in GA4:
There are some limitations when working with events in Google Analytics 4 (GA4). Here are a few key limitations:
- Maximum Event Parameters:GA4 allows up to 25 event parameters per event. Each parameter can have a maximum of 100 characters for the name and 500 characters for the value.
- Maximum Event Names: GA4 supports up to 500 unique event names per property. It’s important to choose event names that are descriptive and meaningful to avoid exceeding this limit. In Google Analytics 4 (GA4), the maximum length for an event name is 40 characters.
- Data Sampling: In cases with high events, GA4 may use data sampling to process and analyze the data. This can result in aggregated or sampled data being used for reporting, which may not accurately represent the complete dataset.
- Data Retention: GA4 has a default data retention period of 14 months. This means that event data older than 14 months may be automatically deleted and no longer accessible in GA4 reports.
It’s important to be aware of these limitations when planning and implementing event tracking in GA4. Understanding these boundaries can help ensure accurate and effective data collection and analysis within the available constraints.
Conclusion:
Setting up events in Google Analytics, including GA4 migration services, is a crucial step in gaining valuable insights into user behaviour and measuring the effectiveness of your digital initiatives. Whether you opt for automatically collected events or define custom events, tracking specific interactions or actions, including GA4 migration services, provides you with a deeper understanding of how users engage with your website or app. You can monitor important metrics by setting up events, such as button clicks, form submissions, video views, social media engagement, and GA4 migration services. This data empowers you to make informed decisions, optimize your digital strategies, and improve the user experience, including GA4 migration.
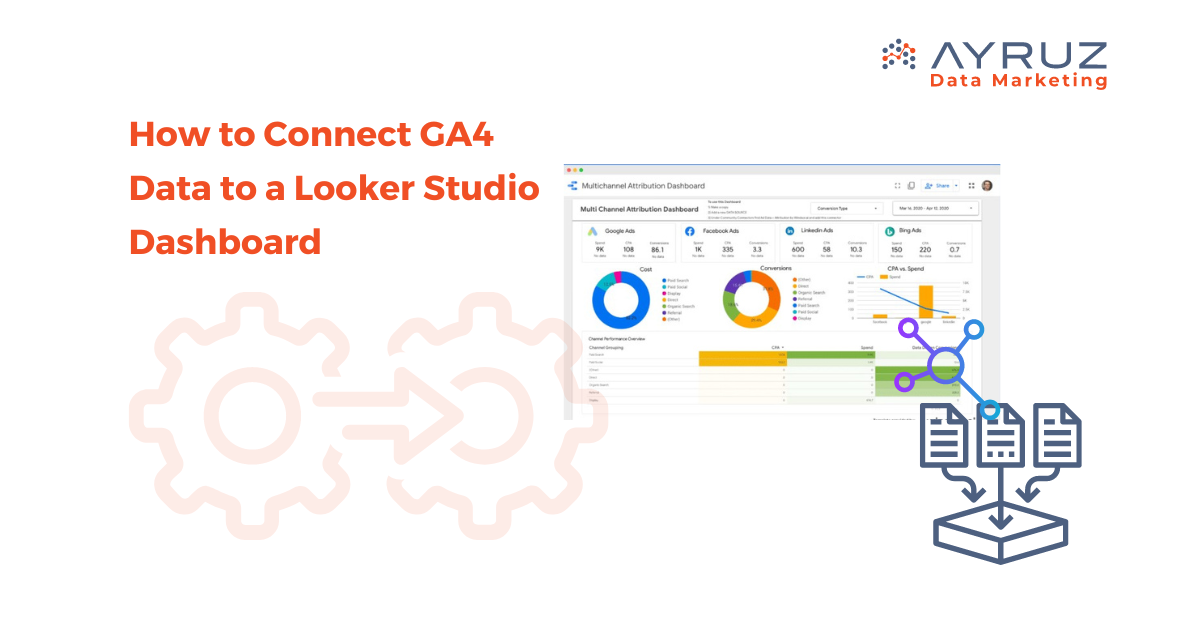
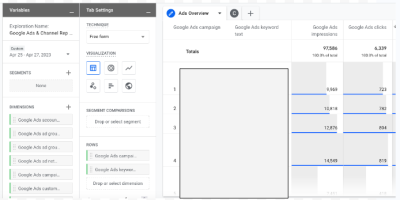
How to Connect GA4 Data to a Looker Studio Dashboard
In today’s data-driven world, businesses rely on powerful analytics tools to gain insights and make informed decisions. For example, Google Analytics 4 (GA4) is a tool that helps organizations track and analyze user behavior on their websites and applications. On the other hand, Looker Studio is a powerful data exploration and visualization platform that enables users to create interactive dashboards and reports. This article will explore how to connect GA4 data to a Looker Studio dashboard and highlight the key advantages of using Looker Studio.
How to Connect GA4 to Looker Studio
Step 1: Set up Google Analytics 4: Before connecting GA4 data to Looker Studio, you must correctly set up your Google Analytics 4 property. This involves creating a GA4 property in your Google Analytics account and implementing the necessary tracking code on your website or application. Once your GA4 property is running, you can start collecting data.

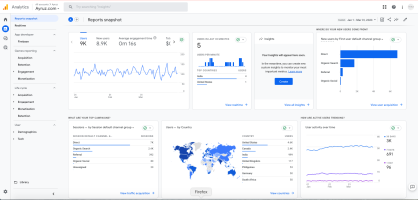
Once you have logged in, you will see a screen that looks like this
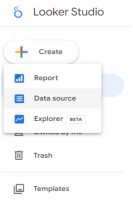
Step 2: Connect GA4 to Looker: To connect GA4 data to Looker Studio, you will need to follow these steps:
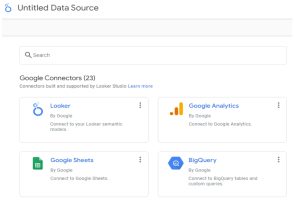
- Open Looker Studio and navigate to the “Data Source”
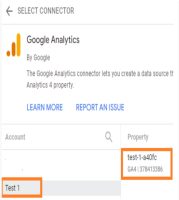
2. Select “Google Analytics 4” as the Google Connectior type.
3. Select the desired GA4 property from the list of available properties.
4. Configure the connection settings, such as the date range and other filters, to define the data you want to import into Looker Studio.
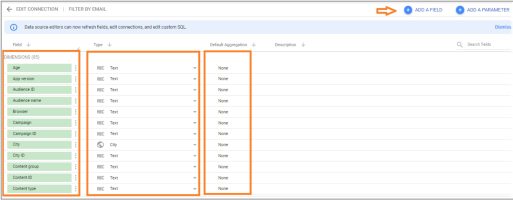
- Save the connection and proceed to the next step.
Step 3: Build a Looker Studio Dashboard: Once the GA4 connection is established, you can build a Looker Studio dashboard to visualize and analyze your GA4 data. Looker Studio’s drag-and-drop interface allows you to create interactive and dynamic dashboards effortlessly. As a user, you can choose from various visualization options, such as charts, tables, and maps. This will enable you to present your data clearly and meaningfully.
Key Advantages of Looker Studio
- User-Friendly Interface: Looker Studio offers an intuitive and user-friendly interface, making it easy for technical and non-technical users to create and explore data dashboards. The drag-and-drop functionality simplifies the process of building visualizations, reducing the need for complex coding or scripting.
- Real-Time Data Insights: Looker Studio lets you connect to various real-time data sources, including GA4. This means you can access the latest data and gain insights into user behavior and website performance. Real-time data updates enable you to make timely and informed decisions.
- Interactive Dashboards: With Looker Studio, you can create interactive dashboards that enable users to explore data and ask ad-hoc questions. Users can drill down into specific metrics, apply filters, and change visualization options on the fly, empowering them to find answers to their specific queries.
- Collaboration and Sharing: Looker Studio facilitates collaboration among team members by providing easy sharing options. You can share dashboards, reports, and visualizations with colleagues or stakeholders, allowing them to access and interact with the data. Looker Studio also offers robust security and access controls to ensure data privacy.
- Scalability and Customization: Looker Studio is highly scalable and can handle large volumes of data. It offers customization options that allow you to tailor your dashboards to meet your specific business requirements. You can create custom calculations, implement business rules, and even embed Looker Studio dashboards into other applications or websites.
Limitations of Data Studio:
- Real-Time Reporting: Real-time reporting in GA4 is not currently supported in Data Studio. You can still access real-time data in the GA4 interface, but it’s not available for direct integration into Data Studio dashboards.
- Data Freshness: Data Studio relies on the Google Analytics API to fetch data, and there might be a slight delay in data freshness compared to the real-time data available in GA4. The data may take some time to propagate and become available for visualization in Data Studio.
- Lack of Customization: While Data Studio offers a wide range of visualizations and customization options, it may have limitations when fine-tuning certain elements’ appearance and functionality.
Conclusion: Connecting GA4 data to Looker Studio allows for analyzing and visualizing your website or application performance during the GA4 migration process. In this article, we will guide you on easily connecting and using Looker Studio’s interactive dashboards to gain valuable insights from your GA4 data. Follow the outlined steps to seamlessly integrate GA4 data into Looker Studio. With its user-friendly interface, real-time data updates, and collaboration features, Looker Studio empowers businesses to make data-driven decisions and drive success throughout the GA4 migration journey.
How to Configure Google Analytics 4 in Google Tag Manager
Introduction
In the intricate world of web analytics, the integration of Google Analytics 4 (GA4) with Google Tag Manager (GTM) stands as a beacon of efficiency. But, a common question lingers: “Do you need Google Tag Manager with GA4?” Let’s unravel the answers as we delve into the steps of configuring GA4 in GTM.
Do You Need Google Tag Manager with GA4?
Before we jump into the how-tos, let’s address the crucial question. Yes, you need Google Tag Manager with GA4, and here’s why. GTM acts as the facilitator, simplifying the implementation of various tags, including GA4. It streamlines the process, making it more manageable and less prone to errors.
How to Add GA4 to Google Tag Manager
Now, let’s get our hands dirty with the steps to seamlessly configure GA4 within GTM.
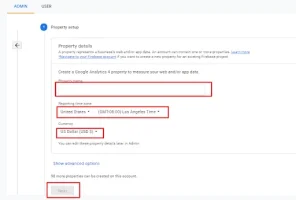
Step 1: Create a Google Analytics 4 Property
- Log In to Google Analytics: Begin by logging into your Google Analytics account. If you’re new to the game, create an account and set up a property specifically for GA4.
- Access GA4 Property: Locate the GA4 property and click “Set up GA4.” This initiates the setup process.
Step 2: Set Up a GA4 Tag in Google Tag Manager
- Access Google Tag Manager: Log in to GTM to start the configuration process.
- Create a New Tag: In your GTM dashboard, create a new tag. Choose “Tag Configuration” and then select “Google Analytics: GA4 Configuration.”
- Enter GA4 Measurement ID: Head back to your GA4 property and find your Measurement ID under Admin > Property > GA4 Settings. Copy and paste this ID into the corresponding field in GTM.
- Choose Trigger: Determine when the tag should fire. Typically, it’s set to fire on all pages, but customization is at your fingertips.
- Save and Publish: Save your tag setup and click “Submit” to publish the changes. This ensures that your GA4 configuration is live.
Step 3: Test and Verify
- Preview Mode: Activate GTM’s preview mode to ensure your GA4 tag is firing correctly. Navigate your site to verify data transmission to GA4.
- Real-time Reports: In GA4, visit the Realtime section to confirm that your data is being captured. This step ensures your setup is functioning seamlessly.
Conclusion
So, to circle back to our initial question, “Do you need Google Tag Manager with GA4?” Absolutely. The integration of GA4 with GTM is a powerhouse move, offering simplicity and efficiency in the analytics realm. Now armed with the knowledge of how to configure GA4 in GTM, you’re ready to navigate the digital landscape with precision and data-driven insights.
Stay ahead, stay optimized, and let GA4 and GTM be your dynamic duo in the digital analytics game!